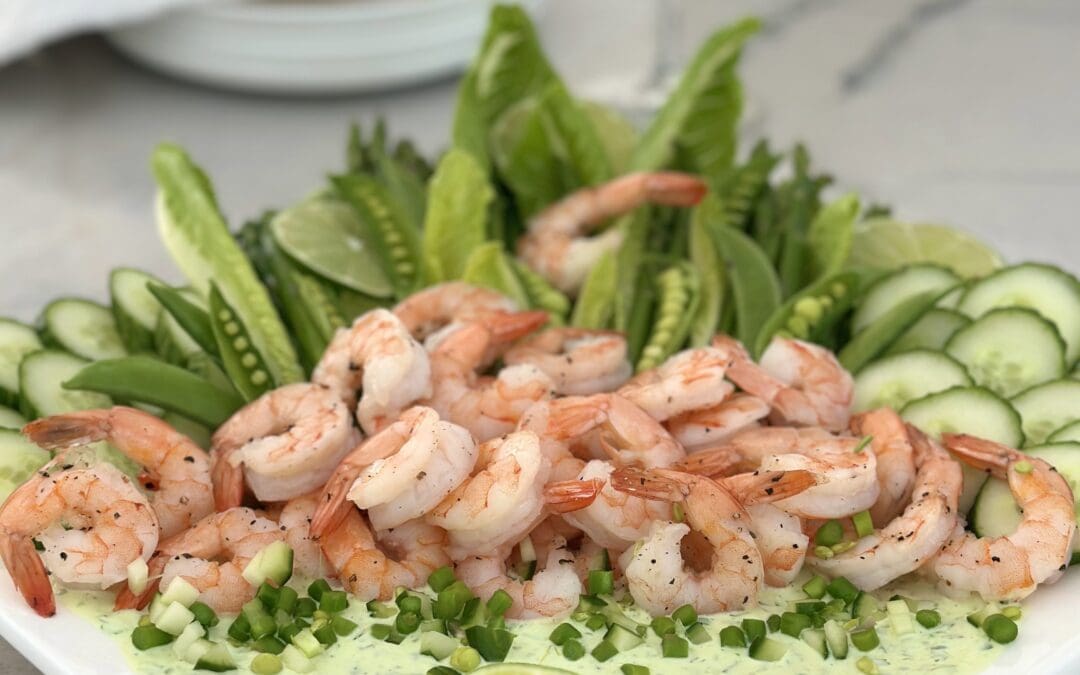
Loaded with fresh herbs and bright citrus flavour, this roasted shrimp with creamy herb dip and a heap of fresh crisp vegetables is the perfect appetizer for your Easter celebration, Mother’s Day gathering or first patio party of the spring season!

Here in the mountains of British Columbia, we love all things winter – which is a good thing because winter here is long. If you head up one of the mountains, you’ll have no trouble finding snow well into May (and sometimes June!), which suits the skiers just fine. When the snow melts in the valley though, and green shoots appear in the gardens, it’s a cause for celebration, because after a long winter there’s nothing better than spring produce and the bright taste of fresh herbs.
Perfect for those first sunny days of spring, this spring appetizer recipe is light and refreshing. It’s the type of dish that disappears quickly, as everyone reaches for more and more, until all that remains is the empty platter. That’s just fine though, because the shrimp, vegetables and even the Greek yogurt – based dip are just as healthy as they are delicious.
 DRINK PAIRING
This appetizer is made to be enjoyed with a refreshing beverage, and the fresh green vegetable flavours are the perfect match for a glass of Sauvignon Blanc. Feel like a cocktail? Try a classic Gin and Tonic, a lime-based Margarita or a Martini. (A vodka martini is pretty great, but a gin martini is even better)
SERVING SUGGESTIONS
This platter of roasted shrimp with creamy herb dip and spring vegetables is the prefect light and refreshing appetizer that won’t ruin anyone’s dinner. Serve it alongside a bowl of salted roasted almonds and a cold drink for a memorable pre-dinner snack. This recipe also makes a lovely light lunch, served with crostini on the side, and is an unexpected but welcome addition to a potluck table. Get ready for all the oohs and ahhs when you arrive with this platter!

How to make Roasted Shrimp with Spring Vegetables and Creamy Herb Dip
Make the Creamy Herb Dip The beauty of this fresh recipe is that much of it can be prepared in advance and stored in the fridge until you’re ready to assemble your appetizer platter. In fact, the creamy herb dip benefits from a little rest time in the fridge, allowing the flavours to combine and meld together for an addictive spread that is perfect with the roasted shrimp and the crisp veggies. Make it up to one day in advance and store it in a covered container. It’s good as soon as it is made, but it’s even better after it has chilled for a few hours.
Blanch the asparagus For tender crisp asparagus, blanch them up to a day ahead and store them well wrapped in the fridge. Never blanched vegetables before? See “Cooking School: How to blanch asparagus” below for full instructions on this easy technique. The big benefit of blanching is that it stops the cooking process in its tracks, locking in the bright green colour and tender crisp texture. It takes just a few minutes and you can blanch asparagus in advance, without worrying about mud green, limp and soggy stalks.
Roast the shrimp Roasting shrimp is probably the easiest way to cook shrimp. Simply toss them with a little olive oil, salt and pepper and lay them out on a sheet pan. Pop them into a hot oven and go about your business of slicing cucumbers or laying out wine glasses. Come back 5 or so minutes later to perfectly cooked, ready to eat shrimp. I used medium shrimp in this recipe and they take just 5 or 6 minutes to become firm, pink and opaque. Go ahead and use larger shrimp if you’d like, just cook them a few minutes more. Either way, it’s an easy and hands-off way to cook perfect shrimp. Please don’t be tempted to buy a frozen shrimp ring for this recipe. I’m all for kitchen shortcuts, but there’s a world of delicious difference between those limp, watery, flavourless, pre-cooked shrimp sold on a ring with cocktail sauce- and ones you roast yourself. Once you master this easy technique, you’ll use it over and over again to roast shrimp for a classic shrimp cocktail, to toss with pasta for a quick dinner, or to round a simple salad into a full meal.
Are frozen shrimp ok? Of course! Unless you live seaside and have access to fresh-off-the-boat shrimp, most of the shrimp you buy will have been frozen at some point. Even the shrimp sold fresh at the fish counter likely say “previously frozen” in the small print, simply because fresh raw shrimp spoil very quickly. I live in British Columbia for part of the year and even the shrimp sold fresh in my town has been previously frozen to ensure it makes it safely up the highway from the docks in Vancouver. All that to say that frozen shrimp are fine. It’s just a question of WHICH frozen shrimp. Skip the precooked frozen shrimp sold in rings or otherwise, and look for quality raw frozen shrimp that are labeled as “flash frozen” or “individually quick frozen” for best results. Thaw them in the refrigerator if you have time, or under cold running water if you need to thaw them quickly. Use a pairing knife to help remove the shells and devein the shrimp. What’s deveining? I’ve got you covered on that one too. See below.

Assembling This Appetizer
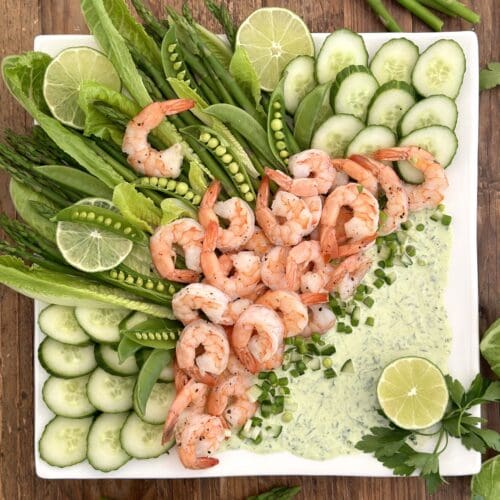
Sometimes I pour the Creamy Herb Dip into a small bowl and tuck the bowl into a simple heap of spring vegetables, with the shrimp nestled in alongside for a rustic and simple presentation that is no less beautiful. However, when you’re pulling out all the stops and really want to thrill your guests, here’s how to put together this platter.

- Spoon the dip onto half of a large platter, using the back of a spoon to spread it out.
- On the empty side of the platter, start by placing the romaine leaves so they face upward, burying their cut ends into the dip. Set 2 asparagus spears aside for garnish, and slide the rest of the asparagus spears inside and beside the romaine, letting their ends touch the dip. Set aside a cucumber slice, then tuck the remaining cucumber slices is on either side, laying them together tightly with their edges overlapping.
- Add whole and opened sugar snap peas on top of the asparagus. To open the sugar snap peas: Carefully run the tip of a pairing knife along the inside seam of a few of the sugar snap peas. Use your fingers to gently open the pod, keeping the row of peas inside attached. Cut off the empty side of the pod and discard (But, don’t really discard them. They’re sweet and crunchy and I usually snack on them because they’re delicious!). Don’t worry if a few of the peas fall out, or if a pod doesn’t split nicely, because you can use the stray peas for garnish (more details on that below)
- Pile the shrimp between where the vegetables meet the dip to cover the seam, keeping the tails facing upwards. Allow some of the shrimp to fall into the dip and fan a few shrimp out over the vegetables.
- To garnish: Finely chop the reserved asparagus spears and cucumber slice. Add them to a small bowl along with any stray peas. Toss to evenly mix. Using your finger tips, sprinkle the finely chopped veggies in a line along where the shrimp meet the dip. Tuck in a few lime wheels and fresh herbs to finish your beautiful platter.

Roasted Shrimp with Creamy Herb Dip
Ingredients
For the creamy herb dip
- 1 Tbsp freshly squeezed lime juice
- 1/2 clove garlic, green germ removed and minced
- 1/2 cup plain Greek yogurt
- 3 Tbsp good mayonnaise
- 1/4 cup parsley leaves
- 1/4 cup cilantro leaves
- 1/4 tsp kosher salt
For the shrimp
- 1 lb/454 gr medium shrimp (about 31-40 count)
- 2 tsp olive oil
- 1/2 tsp kosher salt
- freshly ground black pepper
For serving
- 1/2 English cucumber, cut in slices
- 1 Romaine lettuce heart, leaves separated and trimmed
- 1 cup sugar snap peas
- 1/2 bunch thin asparagus, blanched (see blanching instructions below)
- lime wheels and fresh parsley sprigs for garnish (optional)
Instructions
For the Creamy Herb Dip
- In a small dish, combine the lime juice and the minced garlic. Set aside for 5-10 minutes while you prepare the other dip ingredients.
- To the bowl of a small food processor, add the Greek yogurt, mayonnaise, parsley, cilantro and salt. Add the lime juice and garlic mixture, and process until almost smooth and the dip has become a pale green colour. Taste and adjust salt if needed.
For the Roasted Shrimp
- Preheat the oven to 400F. Line a large baking sheet with parchment paper and set aside.
- Peel and devein the shrimp, leaving the tails on if desired. Place the shrimp on the prepared baking sheet and and drizzle with the olive oil. Toss the shrimp in the oil, then spread the shrimp out in an even layer. Sprinkle with salt and freshly ground black pepper.
- Roast the shrimp in the oven for 5-7 minutes, until pink and cooked through. Remove the pan from the oven and set aside to cool. Can be made one day ahead and kept in a covered container in the fridge until ready to serve.
- Serve the cooled shrimp and the prepared vegetables with the creamy herb dip. Garnish the platter with lime wheels and fresh herbs if desired.
COOKING SCHOOL: HOW TO BLANCH ASPARAGUS
Blanching is an easy technique that gives asparagus a tender crisp texture and retains its bright green colour.
- Prepare the asparagus by washing it well to remove any grit and snapping off the woody ends. (Note that asparagus will naturally bend at the spot where the woody end meets the tender part of the stalk. Simple bend the end of the stalk until it snaps off.)
- Bring a large pot of water to a boil. While waiting for the water to boil, prepare an ice bath by filling a large bowl half way with ice. Pour cold water over the ice to cover and submerge the ice. Place the ice bath near the stove.
- Once the water has come to a boil, add plenty of salt (about 1 Tbsp of kosher salt for 5L of water). The salt with season the asparagus and help preserve the bright green colour.
- Add the asparagus to the boiling water and allow to cook just until tender, about 3 minutes for thin stalks (4-5 minutes for thicker stalks). Remove the asparagus from the boiling water with tongs and immediately plunge it into the ice bath. The sudden drop in temperature will stop the cooking immediately, preserving the tender crisp texture and bright green colour. Once the asparagus is chilled, it can be removed to a paper towel lined kitchen towel and patted dry. Roll the dried asparagus up in the paper towel lined kitchen towel and transfer to the fridge until ready for use. Blanched asparagus can be prepared a day in advance, and stored in a covered container (still wrapped in the kitchen towel) in the fridge.
What else can you use blanched asparagus for?
- an unexpected addition to a crudité platter
- serve it cold for brunch tossed with a Greek vinaigrette and topped with feta cheese
- toss it into a pasta primavera
- stir it into a risotto near the end of cooking
- serve it in a salad, such as this Spring Salad with Chicken and Lemon Dressing

COOKING SCHOOL: HOW TO PEEL AND DEVEIN SHRIMP
The “vein” in a shrimp is actually not a vein at all. It’s the brownish or black line that runs down the back of the shrimp and is in fact the animals digestive tract. It could be clear (and thus an empty digestive tract and no big deal) or it could be full of unappetizing grit, in which case you will definitely want to remove it. You can sometimes buy good shrimp already peeled and deveined, but preparing raw shrimp involves just a few steps and is a an easy process once you get the hang of it.
- If the head of the shrimp is still attached (it probably won’t be), start by pulling it off.
- Use a sharp pair of kitchen scissors or a pairing knife to snip a bit of the shell to get you started. Use your finger tips to peel off the shell, leaving the tail intact if you’d like. Leaving the tail on makes it easier to pick up a shrimp served as an appetizer and adds a decorative touch, but tails are best removed for a dish that will be eaten with a fork, such as a pasta or salad.
- Run the tip of a pairing knife down the curved back of the peeled shrimp to make a shallow slit, stopping just before you reach the tail. Spread the cut sides of the shrimp to expose the vein. Use the tip of the pairing knife or a toothpick to gently lift out the vein. Keep some paper towel handy to wipe the vein off your knife (or toothpick), keeping your work surface free from grit.

RECIPE NOTES
- Since this appetizer recipe makes a relatively small amount of dip (about one cup), a mini food processor or the small bowl attachment of a regular food processor is the right size. The recipe can easily be doubled for a larger crowd.
- Even the freshest garlic can sometimes have a bit of an unpleasant bite when served raw. Combining the fresh garlic and the lime juice and allowing it to rest for 5-10 minutes helps to neutralize any sharp burn. To ensure that you’re using the freshest garlic possible, look for bulbs that are tightly closed and firm when squeezed. Avoid any garlic heads that are squishy, have loose, peeling papery skin or visible green sprouts. Speaking of green sprouts, if you cut into a garlic clove and you see there is a greenish-yellow germ in the centre, use the tip of a pairing knife to lift it out as it can also contribute to the burn.